Solstice Time Lapse over Fairbanks, AK

With the temps hovering around a chilly 45 below, the low sun angle of the shortest day of the year provided little warmth.  A far cry from the fire and brimstone hypothesized for the day.  While neither of us were excited about the end of the world, as the camera clicked away, we couldn’t help but think a little hellfire might be nice after the cold temps we have been seeing in Fairbanks these last few weeks.

The morning of the Solstice we woke around 8:30 knowing we had plenty of time to set up the camera equipment before sunrise at 11 am.  Funny thing though, when you want it to be light during the Alaskan winter it never is, but when you’re trying to capture first light it happens way before you expect it.  As we rolled out of the house just after 9 the sky was already blue with just the perfect touch of pink.  So much for getting first light, but with the lack of clouds in the sky and the Alaska Range in full view dominating the southern skyline, we knew it would be a perfect day for photographing and the stress over our late departure became irrelevant.  An hour later we were set up upstairs in one of the large windows of the University of Alaska Museum of the North, who graciously let us block their hallway with our equipment and visit and revisit their exhibits for the next 7 hours.

The final time lapse that you see here is composed of 2,333 photos.  That is one photo taken every 9 seconds from 10 am until a little after 3:30 pm.  Our hope was to capture the brief daily appearance and the low trajectory of the sun from these northern latitudes. I think we did just that, see for yourselves…

As a side note, after arriving home from the museum we ventured out into the cold for a short walk with our dogs and to our apocalypse weary minds watched the ice fog above town light up accompanied by large explosions that reverberated under our feet, could this be it? Have no fear Fairbanksans, turns out it was just some jovial fireworks, celebrating either the return of the sun or the fact that we were not all incinerated in a giant inferno the likes of which Sam McGee would be proud of.  Fireworks on the apex of the end of the world Fairbanks… maybe not such a good idea?

Blurring backgrounds on portrait photographs

An important thing to consider while doing portrait photography is depth of field. In short, the area of the image that is in focus. You can get depth of field in a variety of ways that I may cover in a later post but the simplest is simply by adjusting your aperture to a large size (smaller number) or a small size (larger number), the larger the aperture i.e. 1.4, 2.8 etc. the less depth of field you will have in your image. Portraits are usually focused on the person as your subject and thus they are typically what you want in focus with the eyes being your primary focus point.

Now that we have talked about the usual way we get the DOF we want lets look at how you can use photoshop after you have gone home and realized you didn’t get enough of a blur on the background and it is still too distracting. I am no expert in photoshop and so I will leave the full step by step process to someone else (there are plenty of writings on this if you search Google). Basically what you are going to do is this:

  1. Open your image in Photoshop
  2. Duplicate the layer
  3. On the bottom layer go to Filter>Blur>Gaussian blur
  4. Set the blur to a level that is not too overdone but removes the background distraction
  5. On the top layer hit edit in quick mask mode
  6. Use the brush tool to highlight the area that you want to blur (just paint with a black color, to erase paint in white)
  7. Exit quick mask mode
  8. Go to Layer>Layer Mask>Selection
  9. At this point you should see your image almost the way you want it
  10. While highlighting the mask in the layers pallet go back and brush any edges that don’t look right, it helps to experiment with brush hardness and opacity to get the edges to look natural.
  11. Save your new image and marvel at the difference.

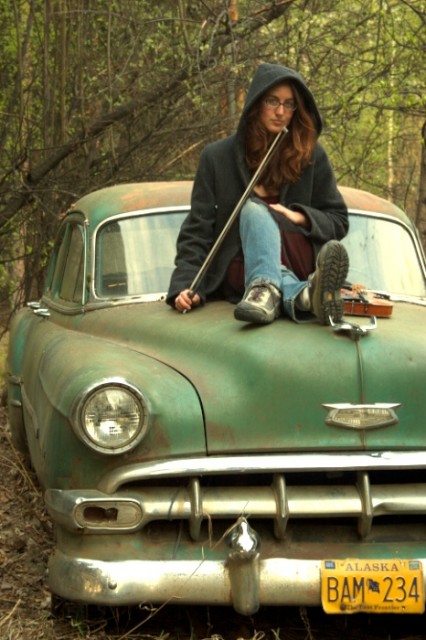
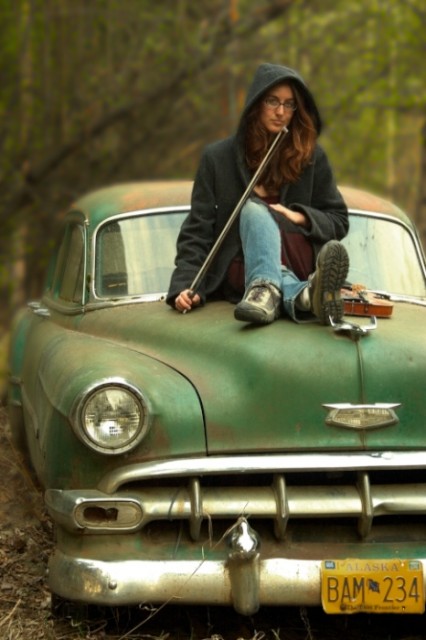
That is a very basic list of the steps involved, my intent was to only inform you of the possibilities when your equipment alone cannot give you the results you would like.

Bellow are some images I edited in about 10 minutes to highlight the effect.

Violinist Good Daze PortraitViolinist portrait with blurred background